How to Check Your QR Code’s Readability Before Printing

Key Takeaway
Check your QR code before printing with QRLynx Scan Score, real screenshots, an exported-file scan and a practical physical-proof checklist.
Check your QR code before printing in three stages: review its design, decode the final exported file, then scan a physical proof at its intended size and placement. QRLynx’s QR Code Readability Score helps with the first stage by showing which design settings affect its live Scan Score.
This tutorial follows a real example: a score of 73 rises to 93 after removing the default icon, and the downloaded PNG decodes to https://example.com. The screenshots show the actual QRLynx interface. The example is a demonstration URL, not a campaign destination. We did not perform a physical print test; that final approval must use your production artwork and material.
What each check tells you
| Check | Useful evidence | Still to verify |
|---|---|---|
| Live Scan Score | Design warnings based on current generator inputs | Final file, print margin, material and camera performance |
| Exported-image scan | The decoder can recover the intended payload from that file | Destination behavior and readability after printing |
| Physical proof | The tested print works on the tested devices in the recorded conditions | Other placements, production changes and future destination availability |
A score of 93 is not a 93 percent probability of a successful scan. Even a score of 100 cannot approve a print run by itself.
How to check QR readability in QRLynx before printing
Enter the actual destination
Open the QR Code Readability Score page and choose Website / Link for a web destination. Enter the final URL. Use a static code when the encoded URL should stay fixed; choose Dynamic URL when you need an editable destination. For this demonstration we used example.com, then turned off Track Scans and Dynamic URL before exporting a static QR.
Open the Scan Score breakdown
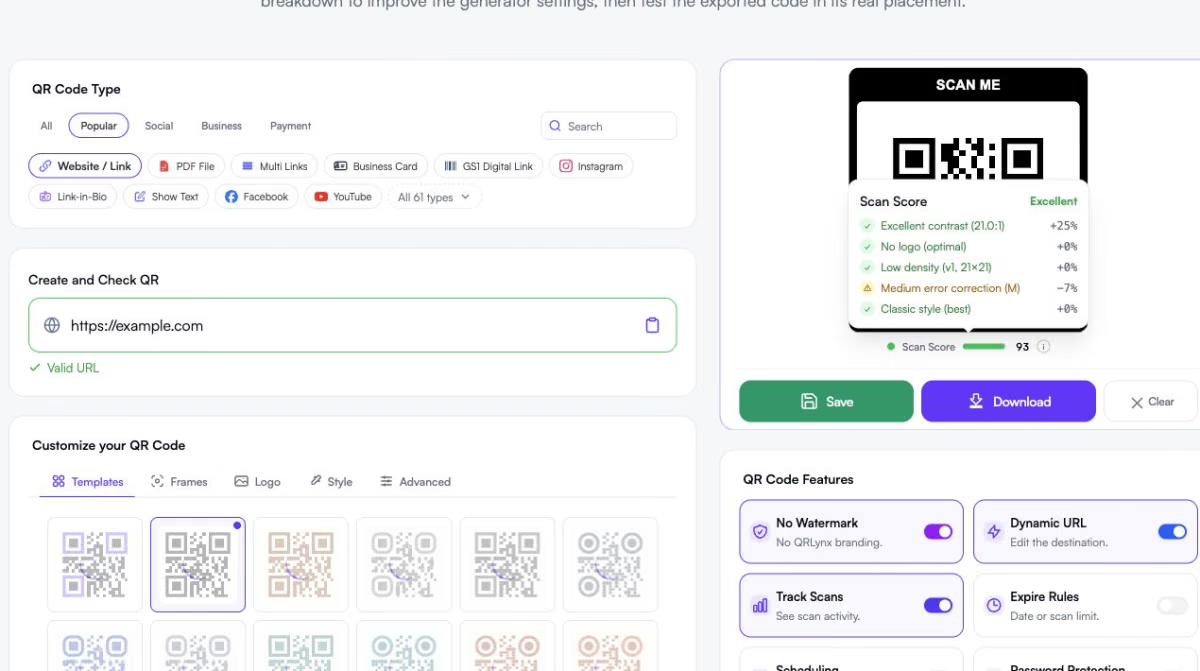
Select Scan Score below the QR preview. Read the label and each listed reason. The example starts at 73, with excellent contrast, a logo-size warning and medium error correction. Your starting values depend on your current design.
Change one design input
For the example, open Logo and turn off Show default icon. Reopen Scan Score and compare the result. It rises to 93 because the logo-size deduction is removed. If you need branding, use a smaller logo and retest rather than treating logo removal as mandatory.
Set a clear print margin
Open Advanced. Under Quiet Zone, choose Medium for four modules per side or Large for six. Keep text, frame ink and surrounding artwork outside that clear area. Changing this setting does not change Scan Score, so inspect it separately.
Export and decode the final file
Choose Download and the required format. In a signed-in workflow, downloading a new QR can also save it to your account. Open the QRLynx QR Code Scanner, choose Upload Image(s) and select the exported PNG. Compare the decoded text with the intended URL. For a dynamic QR, follow its managed link and verify the final destination too.
Approve a physical proof
Place the original QR export in the finished artwork without stretching or cropping it. Print a proof at the final size on the intended material. Scan with representative phones from the intended distance and lighting, then verify the destination and visitor action. Repeat after any artwork, export or production change.
A real change from 73 to 93
The initial example used black modules on white, classic styling and M error correction. Its breakdown reported Logo too large (40% of QR), with a 20-point deduction. This was the configured default icon in that editor session, not a claim that every new QRLynx QR starts with the same settings.
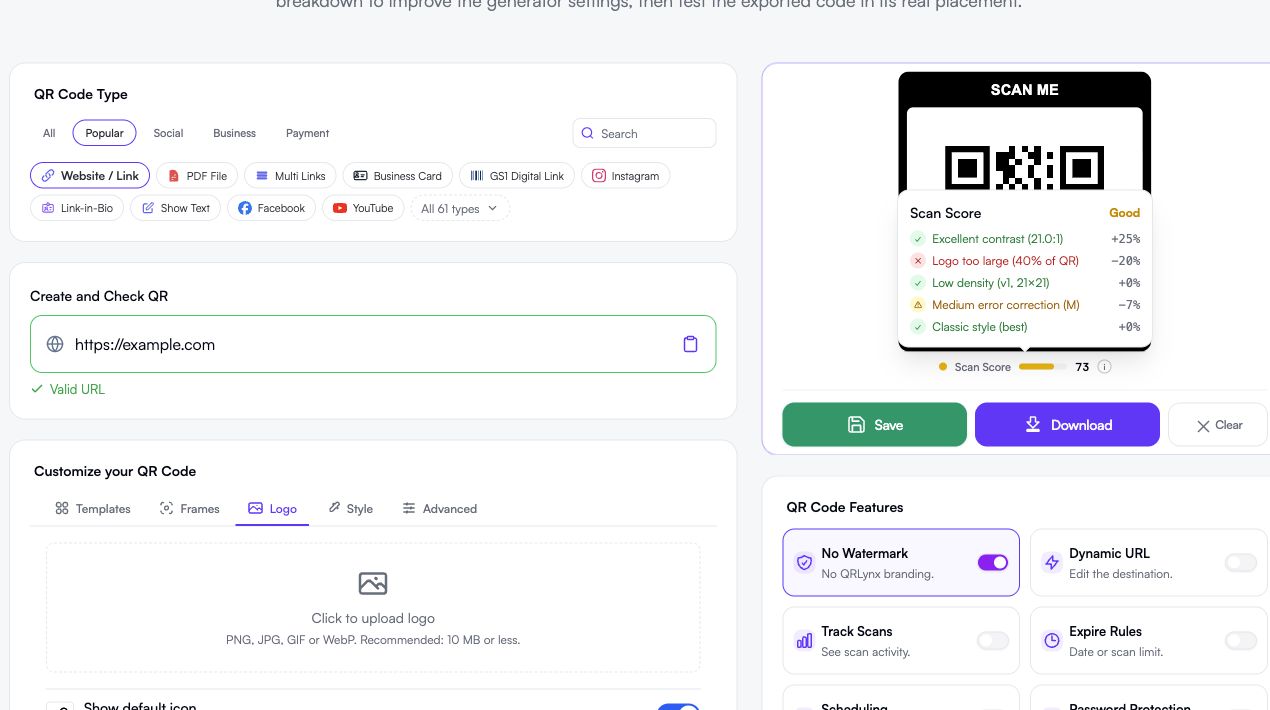
After turning off Show default icon in the Logo tab, the breakdown showed No logo (optimal) and a score of 93. We left M error correction in place. The purpose was to resolve one identifiable design issue, not to force every setting to produce 100.
These are score points, not measurements of how many phones will read the code. If your logo is essential, reduce its footprint and verify the exported and printed result. Do not interpret an error-correction percentage as permission to cover that percentage of the image.
Read all the score inputs
QRLynx’s live estimate considers six inputs. Finder-eye contrast appears as a separate check when the eye color differs from the body color.
- Body contrast: compare the foreground with the background. Dark modules on a light, solid background are a practical starting point.
- Finder-eye contrast: keep the three corner markers distinguishable from the background, even when their color differs from the body.
- Logo size: reduce or remove a mark that obscures too much of the QR pattern.
- Estimated data density: review unnecessarily long encoded content. The displayed version is an estimate, not a measurement of the exported symbol.
- Error correction: choose a suitable setting for the design and conditions. Higher correction can add density as well as recovery capacity.
- Module style: simplify decorative shapes when they make scanning harder.
The score labels are Excellent at 80 to 100, Good at 60 to 79, Fair at 40 to 59 and Poor below 40. Use the specific warnings to decide what to change. For the underlying recovery tradeoff, see DENSO WAVE’s error-correction explanation.
Check the margin separately
Scan Score does not measure the quiet zone. In our example, removing the icon raised the score to 93 while the margin was still Minimum, one module. Selecting Medium increased the reserve to four modules per side without changing the score.
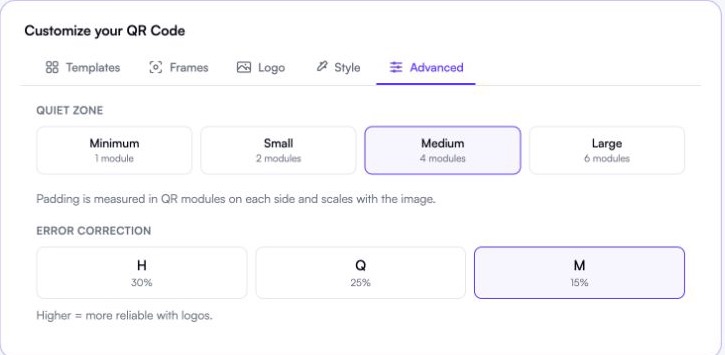
QRLynx offers Minimum (1), Small (2), Medium (4) and Large (6). For a standard QR print layout, preserve at least the four-module margin described in DENSO WAVE’s code-area guidance. A module is one small square in the QR grid, not a fixed number of millimeters.
Check that the reserve survives placement in the final design. A frame, crop, background photo or nearby text can intrude after export. Our quiet-zone and QR design guide explains how to measure that space. Use the QR print-size guide for module size, pixel dimensions and printer resolution.
Decode the exported file
Download the QR you actually intend to place in the artwork. A screenshot of the generator preview is not the production export. QRLynx offers PNG, JPG, WebP and PNG HD on the free Starter plan; SVG and PDF downloads require Starter+ or a higher plan. SVG is scalable vector artwork. The QRLynx PDF option is an A4 QR sheet containing a raster image, so do not assume the PDF is a vector QR.
Open the QRLynx QR Code Scanner, choose Upload Image(s) and select the file. Our exported PNG returned the exact static payload below.
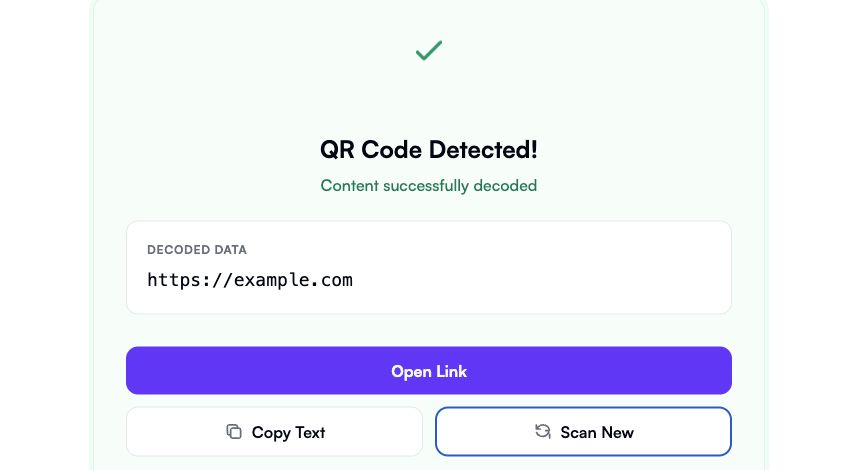
For your campaign, compare the decoded hostname and path before opening the result. A static code should contain the intended direct URL. A dynamic code contains its managed link; follow it and confirm that the correct destination opens. Then check the actual task, such as viewing a menu or reaching the intended form.
After placing the QR in a flyer or label, check the final exported artwork again. A successful scan of the original QR does not prove that a resized, cropped or compressed copy still works. If the file fails to decode, try the original export with the complete clear margin and test with a phone. One decoder failure does not prove failure on every device. The QR scanning troubleshooting guide separates image-reading failures from destination problems.
Review your QR before sending it to print
Check the live design warnings, then decode the export you will place in the artwork.
Before you approve the print run
Give the printer the final artwork revision and record the conditions of your proof. Test the QR where someone will use it, including the surface finish and any packaging curve or fold. A paper-office proof cannot establish how a glossy label will behave on a bottle.
| Record | What to check |
|---|---|
| Artwork revision and file | The proof and production order use the same approved export. |
| Final size and clear border | The QR remains square and its quiet zone is unobstructed. |
| Material and finish | Glare, texture, folds and curvature do not prevent the intended scan. |
| Devices and conditions | Representative phones read it at the expected distance, angles and lighting. |
| Decoded URL and final page | The link and any redirects reach the intended mobile destination. |
| Result and owner | Record pass or fail, the date, tester and any correction needed before approval. |
For example, a tabletop card should be tested on the table at the distance a seated visitor can comfortably hold a phone. A wall poster needs its own test from its expected viewing position. Do not copy a size that worked for the card and assume it will work for the poster.
Hold approval when an expected device cannot read the proof, the destination is wrong or the final artwork differs from the tested revision. Correct the failed stage and repeat the test. For layout and placement choices, continue with the QR flyer and poster workflow.
Questions before printing your QR code
What Scan Score should I aim for before printing?
QRLynx labels 80 to 100 Excellent, but there is no score that approves a print run. Review the deductions, decode the final export and test a physical proof in the intended conditions.
Does 100 mean every phone will scan the QR?
No. Scan Score is a design estimate. It does not inspect the final print, material, viewing distance, glare or every phone camera.
Why did the score stay the same after I increased the margin?
Quiet-zone width is not one of the six score inputs. Check it independently in Advanced and preserve the clear border in the final artwork.
Do I have to remove my logo?
No. The example removes the default icon to demonstrate one score change. If you need a logo, reduce its footprint, keep the pattern recognizable and test the final exported and printed QR.
Should I always choose H error correction?
No. Higher correction can provide more recovery capacity but can also make the pattern denser. Choose for the design and conditions, then test. An error-correction percentage is not a safe logo-cover percentage.
Can I check readability without a QRLynx account?
The public generator displays Scan Score without an account, and the browser-based scanner can decode an image without signup. Saving projects and gated download formats follow their own account and plan requirements.
Why does the scanner show a short link instead of my destination?
A dynamic QR encodes a managed link that redirects to the destination. Check that link, then follow it and confirm the expected final page. A direct static QR encodes its destination itself.
Is a PNG scan enough to approve my printed poster?
No. It proves only that the tested digital file decoded in that scanner. Test the final artwork and a physical proof at the poster’s intended size, distance and lighting.
When should I repeat the checks?
Repeat after changing the QR content or design, resizing or exporting the artwork, changing print size or material, or replacing the destination. Keep the approved file revision with the proof record.