How to Add Meta Pixel, Google Tag Manager or GA4 to a QR Code

Key Takeaway
Add Meta Pixel, GTM or GA4 to a QRLynx dynamic QR code. Follow real screenshots, avoid duplicate tags and verify events in the right platform.
To add Meta Pixel, Google Tag Manager or GA4 to a QR code in QRLynx, open an eligible dynamic QR in an Enterprise workspace, enter the chosen identifier in Retargeting Pixels, select Done, then save or update the QR. The configured tags load on a brief redirect page before the destination opens.
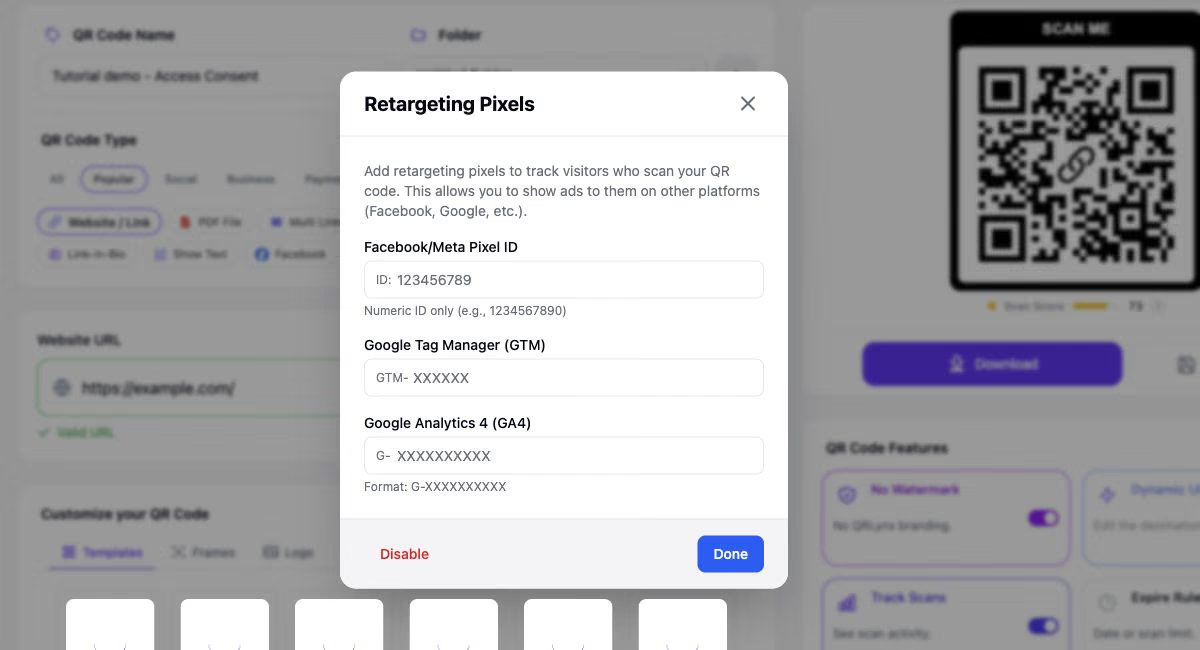
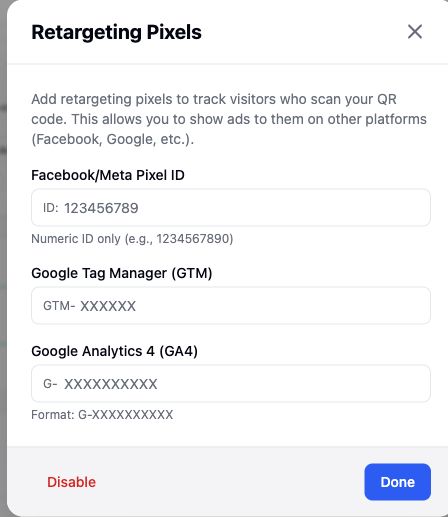
This tutorial covers all three fields in QRLynx Retargeting Pixels, the choice between direct tags and GTM, and how to check that an event reaches the intended platform. The screenshots show the real QRLynx editor. The example ID is illustrative and was not saved or connected to a measurement account.
Choose how to connect your tags
Start with the system that should receive the signal. You can configure one field or combine fields for different purposes. You do not need to fill all three.
| Option | What to enter | What it does on the redirect |
|---|---|---|
| Meta Pixel directly | Your numeric Pixel ID | Loads the base Meta Pixel and requests a PageView event. |
| Google Tag Manager | Your GTM web container ID | Loads the container. Its published tags, triggers and consent configuration determine subsequent activity. |
| GA4 directly | Your G- measurement ID | Loads the Google tag and configures the chosen GA4 measurement destination. |
If your GTM container already configures the same GA4 measurement ID, leave the direct GA4 field empty. Apply the same ownership rule to a Meta Pixel managed in GTM. Configuring the same tag twice can duplicate events or mix settings. Google documents this issue in its tag setup troubleshooting guide.
Check consent before enabling tags
The redirect page runs before your destination page. A cookie banner that appears only after arrival cannot control tags that have already run on the redirect. Decide where the campaign obtains the required permission and how the tag implementation respects that choice before adding IDs.
QRLynx Access Consent can put an acceptance step before access to a QR destination. That gate does not automatically send Google Consent Mode signals or configure Meta consent behavior. The direct pixel fields do not provide a cookie-consent platform. If your workflow needs the destination’s consent manager to control collection, leave redirect tags unset and measure on that destination instead.
For a GTM-managed setup, have the person responsible for tagging verify the consent defaults, updates and allowed tags on the redirect itself. Google requires the default consent state to be set before tags use it. See Google’s consent-mode troubleshooting guidance. Treat content access, age confirmation and advertising consent as separate decisions.
Find the right ID for each option
Meta Pixel
Open Meta Events Manager and select the website pixel or dataset intended for this campaign. Copy its numeric Pixel ID into Facebook/Meta Pixel ID. Use the identifier, not the full base-code snippet. QRLynx supplies the base browser code for the direct option.
If you manage Meta through GTM, configure the pixel there and leave the direct Meta field empty. Meta’s GTM setup guide separates the base pixel from event-specific tags. A purchase or form-submission tag belongs where that action actually happens, not on every QR redirect.
Google Tag Manager
Open the intended Web container in Google Tag Manager and copy its GTM- identifier. A web container differs from a server container. Follow Google’s container setup guide if you need to create one.
In QRLynx, enter the characters after GTM-. Configure the required tags and triggers inside GTM, preview them, then publish the container version. A container ID alone does not create a GA4 event or a Meta campaign. Triggers restricted to your destination hostname will not automatically match the QR redirect hostname.
Google Analytics 4
In the correct GA4 property, open Admin, then Data streams, and select the web stream. Copy its G- measurement ID. Google’s ID lookup instructions explain the property and stream selection.
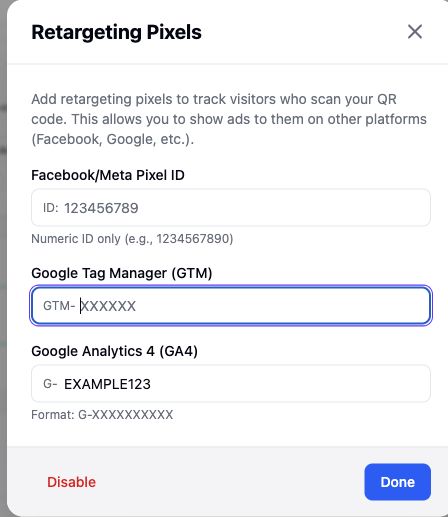
The QRLynx input already displays G-. For an ID written as G-EXAMPLE123, enter EXAMPLE123. This is an illustration, not a working measurement ID. Check the prefix once more when you reopen the saved code.
Finish with the QR’s save action
Closing the dialog is only part of the workflow. Save or update the QR itself, then verify the saved identifiers. To remove one integration later, clear that field and save again. Disable clears all three fields in the dialog; save the QR afterward to retain that change.
Verify the redirect and the received event
Test the URL encoded in the QR, not just the final destination. QRLynx starts the configured browser tags and schedules navigation after about half a second. That handoff is not an acknowledgement from Google or Meta, so a slow network or blocked script can prevent delivery even when the destination opens.
- Meta: select the intended pixel in Events Manager and use its testing tools while opening the QR short URL. Look for the expected PageView and source URL. Meta’s current setup guide also names the Meta Ads Data Advisor browser extension for inspecting pixel events.
- GTM: start Preview in the intended container and connect to the actual short URL. Check the redirect page’s container, fired tags and consent state, then compare them with the published version. Google notes that redirects can interfere with Tag Assistant connections.
- GA4: check the intended property in Realtime. For event parameters, use DebugView with debug mode enabled for the test device. A normal visit is not automatically a debug visit. Follow Google’s DebugView instructions.
If the redirect is too brief for the debugger to connect, ask the tagging developer to inspect preserved browser network requests across the navigation. Record whether the tag script loaded, whether an event request was made and whether the platform received it as separate findings. Do not replace a missing receipt with an assumed success.
The editor screenshots in this tutorial verify the controls and input format. They are not screenshots of received Meta or GA4 events. Use your own test property and an authorized test visit for receipt verification.
If a saved ID produces no visible event
- Check the saved value: reopen the QR and look for an incorrect ID, duplicated prefix or an unsaved edit.
- Check eligibility: the QR must use a supported dynamic route and its owner must retain Enterprise access.
- Check the request: use a normal browser that follows the QR. Automated link checks and likely bots can bypass the pixel page.
- Check GTM: confirm the published version, trigger hostname and consent conditions. A preview-only change is not the published configuration.
- Check the browser: inspect blocked scripts, network failures and the visitor’s consent choice. Do not force collection by overriding a visitor’s choice.
- Check the report: confirm the correct property or pixel and inspect the test time. Standard reports can lag; start with the platform’s testing view.
Two page views can also represent two real stages: the redirect page and the destination page. Check the event’s page URL before calling it a duplicate. A repeated event for the same stage and ID may indicate that both a direct field and GTM configured the same tag.
Keep QR scans, page visits and conversions separate
Imagine a poster that opens a product page. QRLynx scan analytics measures eligible activity at the managed QR route when Track Scans is enabled. A configured redirect tag measures activity on the intermediate page. The destination’s own analytics measures its page visit and any properly configured purchase or form event.
Use a separate named QR for each placement you need to compare. For destination campaign attribution, build a tagged destination with the QRLynx UTM Builder and follow the existing guide to tracking QR scans with QRLynx and GA4. Adding a redirect measurement ID does not automatically copy destination UTM values into the redirect page’s event.
A received PageView may contribute to a platform audience, subject to that platform’s rules and campaign configuration. It does not establish a lead, a sale or an identifiable person in QRLynx. For the wider reporting workflow, read how to interpret scans and destination outcomes.
Connect the campaign’s tracking setup
Prepare the dynamic destination, choose the tag integration and verify the complete visitor journey.
QR tracking tag questions
Which QRLynx plan includes Meta Pixel, GTM and GA4 fields?
Retargeting Pixels require Enterprise. Use an eligible dynamic QR and review the Retargeting Pixels feature for the supported workflow.
Do I enter the complete GTM- or G- ID in the QRLynx input?
The current QRLynx dialog already displays GTM- and G-. Enter the suffix after that displayed prefix, then reopen the saved QR to check the identifier. Enter the Meta Pixel ID as digits.
Can I use Meta Pixel and GA4 together?
Yes. QRLynx supports both direct fields on the same eligible dynamic QR. If GTM already installs either tag, leave its matching direct field empty to avoid configuring the same tag twice.
Does adding GA4 to the QR also install it on my website?
No. The direct QRLynx GA4 setting loads the tag on the brief redirect page. Your destination needs its own analytics setup to measure activity after arrival.
Can this track purchases or completed forms automatically?
The direct Meta integration requests PageView, and the direct GA4 integration configures its Google tag. Purchases and completed forms need event tracking where those actions occur. Do not label every redirect as a purchase or lead.
Why is GA4 DebugView empty after I scan?
DebugView requires debug mode for the test device, the correct property and a received event. A brief redirect, consent controls, blocked scripts or network timing can affect the test. Start with the actual QR short URL and Google’s debugging guidance.
Does Access Consent automatically configure Google Consent Mode?
No. QRLynx Access Consent is an access gate. Google consent defaults and updates require their own supported implementation. Verify consent on the page that loads the tags before enabling the campaign.
Can I add tracking pixels to an existing printed QR?
You can update tag settings on an eligible QRLynx dynamic QR without changing its encoded short URL. A directly encoded static QR cannot gain this redirect integration through a settings change. GS1 Digital Link does not support Retargeting Pixels.
How do I turn off a pixel without changing the destination?
Open Retargeting Pixels, clear the integration’s field, choose Done and save or update the QR. To clear all three integrations, use Disable and then save the QR. Verify the saved settings and visitor journey afterward.